On this page ▾
Overview
The options page contains all existing configurations that you can change and adapt according to your preferences.
Sandboxes

- New sandbox - Opens the New Sandbox configuration modal.
- Add group - Add a new group to the screen after which you can use drag and drop to manage the sandboxes that you want to be grouped in it.
- Export - Exports all of your sandbox configurations as a .json file.
DWithEase does NOT export your passwords!
- Import - Import Sandbox configurations from a .json export file.
Before importing existing configurations, make sure you re-create the Account that the sandboxes used for auto log-in, so that all configurations can find it and continue using it, if they were previously configured with it.
New sandbox
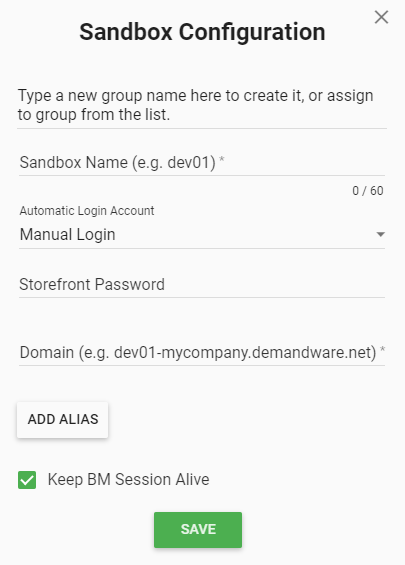
Group name
Group names let you manage easier and better your sandboxes.
Clicking on the First input field will ask you for a group name of the new group. Type in your first group name (for example “Project One”) and click on the green label like this:
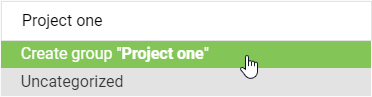
This field is optional. If you do not provide a group for the sandbox it will be automatically located in the “Uncategorized” section.
Sandbox name
Sandbox’s name lets you provide friendly and easily recognizable names to your sandboxes.
Automatic Login Account
Select an account from your pre-saved configurations for auto-login.
This field is optional.
Storefront Password
In this field, you can type in your sandbox storefront password. This will prevent your sandbox from asking you for a Storefront password.
This field is optional.
Domain
In this field, you provide the domain of your sandbox that will be stored.
Keep BM Session Alive
If you check this option, it will keep your Business Manager session alive, which will prevent BM Session from asking you for credentials every 15 minutes.
After we click save and open DWithEase extension from its popup icon located in the browsers popup area, you will see a little bit different menu than the previous one:
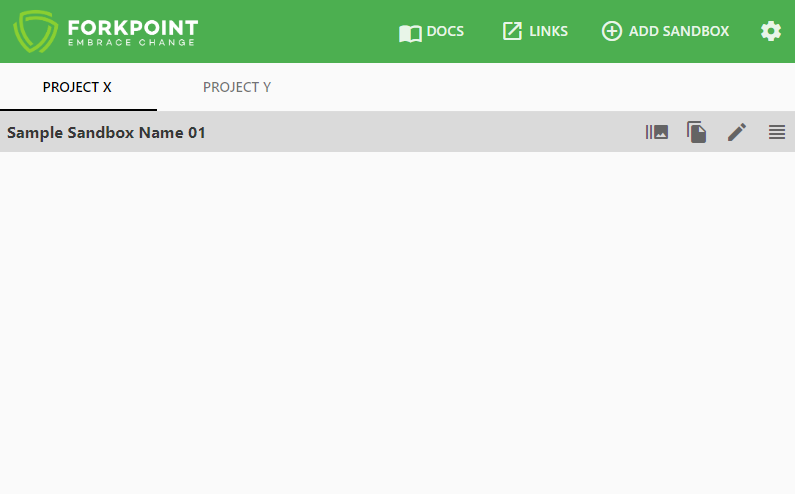
You can change the sandboxes group by dragging the sandbox into the desired group.
Environment Badges
Every sandbox card displays an environment tier badge:
DEV— Development instancesSTG— Staging instancesPRD— Production instancesODS— On-Demand Sandboxes
This provides immediate visual clarity so you never confuse sandbox tiers when switching between instances.
On top of each category, we have the following icons:
delete_forever - Clicking this button will delete the selected group.
Hovering over a Sandbox Configuration will reveal more actions:

edit Opens the edit dialog.
supervisor_account Starts a process of making a Copy of the Sandbox Configuration. A dialog will be open with copied information from Sandbox Configuration, but Sandbox’s name and Domain will have a “copy-” prefix.
open_in_new Opens the home page of the Business Manager.
Permissions
You can manage the URL permissions that you will allow the extension to work on. Below you can find the already whitelisted URLs. If you have any un-whitelisted URLs you will see the Whitelist sandboxes button - use it to whitelist all of your existing aliases or URLs that are not matching the common/general patterns.
Settings
General
Notifications
DWithEase is using notifications to inform the user about new updates, new sandbox configurations, changed password, etc. You can enable/disable them.
Theme
You can change the themes between default (light) and dark.
Popup
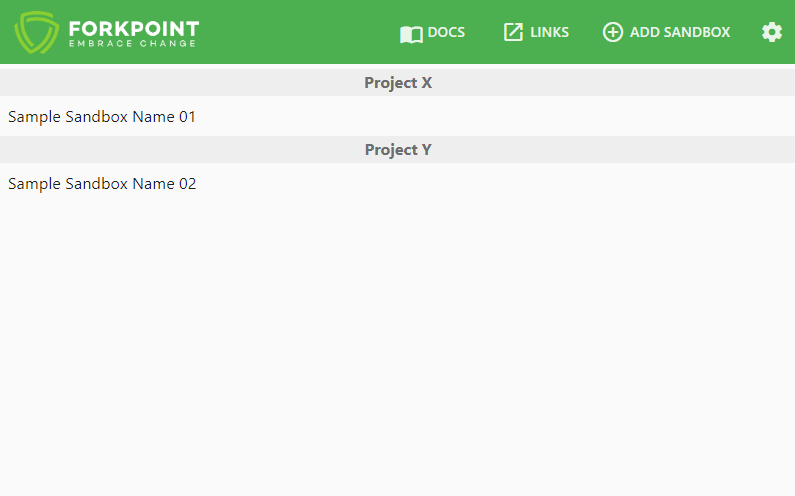
Sandbox groups display mode
Changes the groups display mode:
- Tabs - This option is selected by default and shows your groups as tabs:
- List - Displays groups as a list:
Business Manager
BM Toolbar
This setting is related to the Business Manager Toolbar display behavior. There are 3 options:
- Always show - This will keep BM Toolbar expanded.
- Auto-hide - This will keep BM Toolbar collapsed. By clicking on the ForkPoint logo, you can Toggle its state.
- Don’t show - This will hide BM Toolbar.
Enable Search With Ease Autofocus
Toggle the state whether Search With Ease search bar should focus when the BM page finishes loading.
WebDav
Enable tree view
Switch between the original WebDav view and the Tree View. Impacts the looks of WebDav Directory folders.
Light mode in Logs
Force Light Mode in Logs (no matter what the browser or OS is set to use)
Scroll .log files to bottom when opened
Automatically scroll-down log files to the bottom of the page.
Trim .log files
Logs will be trimmed to show the last Number of lines to trim.
Number of lines to trim
The maximum amount of lines that will be shown in a log.
Recent files period
The amount of seconds a log is treated as RECENT (See tags). Default: 300s
Show timer and auto refresh toolbar
At the Logs page, you will see in top-right a chronometer counting down the time since the page was loaded. By a variety of options, this timer can switch to timer indicating after how long the page will be auto refreshed (if enabled) or to shut it down.
List of selectable options:
- None - This will hide the timer. Auto-refresh is disabled with this option.
- Timer - Time elapsed since the page has been loaded.
Auto-refresh is disabled with these two options. The Refresh log directory period also becomes disabled.
- Auto-Refresh (Pausable) - Timer
 will count down the time for you until the page is automatically refreshed. By clicking on the timer, you can change its state to PAUSED and the timer will stop counting down. To resume counting click the timer again.
 - Auto-Refresh (Toggle) - A timer will count down the time for you until the page is automatically refreshed. By clicking on the timer, you can change its state to a chronometer
 which will count the time since the last load and will DISABLE Auto-Refresh. Clicking then on the chronometer will bring back the timer and will ENABLE Auto-Refresh.
 - Timer (Toggle) - Enables chronometer , counts the time since the last refresh, and Auto-Refresh is DISABLED. Clicking on it it will change its state to a timer which will indicate the time remaining to a page refresh and will ENABLE Auto-Refresh.
Auto-refresh is enabled with this option. The Refresh log directory period becomes enabled.
Refresh log directory period
Set the time (in seconds) after which the Auto-Refresh will refresh the page.
Note: Active only if Auto-Refresh is enabled. (See Show timer and auto refresh toolbar)
Customize tags
Gives you the ability to create/modify/remove Tags. (See Tags page).
Business Manager
Enable Production Controls Injection
Salesforce Commerce Cloud disables several critical authoring and configuration controls when running in staging or production environments. Enabling this setting safely injects missing controls into Business Manager:
- Catalogs: Adds the missing catalog selection checkboxes along with the New and Delete controls (Merchant Tools > Products and Catalogs > Catalogs).
- Attribute Definitions: Injects the New and Delete buttons in Custom Object attribute definitions (Administration > Site Development > Custom Object Types > Attribute Definitions).
- Attribute Groups: Injects the New Attribute Group form and Delete button (Administration > Site Development > Custom Object Types > Attribute Groups).
- Site Import & Export: Restores import controls and enhanced export features (Administration > Site Development > Site Import & Export).
Redirects
Auto redirect to the last page on site change
If you have opened a page and you would like to change the Selected Site, the Business Manager will change the Selected Site but will redirect you back to its homepage. Losing your progress and spending time to go back to where you were is not a good deal. For this annoying behavior, DWithEase offers a simple solution. If you enable this option, when you change the Selected Site, instead of being redirected to the homepage of Business Manager, you will be redirected back to the page where you were before selecting different Sites.
Ask before redirection
By enabling this option the extension will now show a notification popup in the top right corner of Business Manager, asking you if you want to be redirected to the same page as you were before, but in the new Selected Site. You can exclude specific Business Manager Actions to prevent the triggering of automatic redirect when the site is changed. For included pages, you will be automatically redirected even if the “Ask before redirection” option is enabled.
Accounts
In this page, you can store multiple Account Manager accounts and use them to log in quickly in a sandbox with Unified Authentication enabled.
OnePass
OnePass provides an encrypted credential vault for all your stored sandbox credentials and storefront passwords.
Master Passphrase & AES-256 Encryption
Instead of keeping passwords in plain browser storage, OnePass encrypts all account credentials using client-side AES-256 encryption protected by a single master passphrase.
- When locked, credentials cannot be read from storage.
- Passwords are never transmitted over the network and are never included in configuration exports.
Configurable Vault Lifespan
You have complete control over how long your vault remains unlocked:
- Current Session — Automatically locks when you close your browser.
- 8 Hours — Stays unlocked throughout a standard workday.
- 24 Hours — Convenient for extended development and testing sessions.
- Persistent — Stays unlocked across browser restarts until manually locked.
You can lock the vault manually at any time with a single click from the OnePass screen or the extension popup.
Context Menu
You can configure the URLs that you would like to use in your customized browser context menu as shortcuts. The context menu can be accessed by right-clicking inside a saved sandbox browser tab. Rearrange positions with drag and drop, or add new items to the context menu.
On the right side are the Active context menus. At this page you can manage Context Menu.
Redirects
Here you can exclude specific Business Manager Actions to prevent triggering of automatic redirect when the site is changed. For included pages, you will be automatically redirected even if Ask before redirection option is enabled.
Tags
Tags allow quick filtering of WebDav files in a directory. If a file matches a specific tag, it is displayed in the tags column. The built-in tags use specific characteristics such as time, size, etc. Custom tags are using RegEx to match the filename. To filter by tag hover TAGS header and select the desired tag. In the list are shown only tags that match at least one file. You can see two types of tags: System and Custom.
System tags
Built-in tags which will be displayed in WebDav folders. All system tags will be shown at the bottom of the tags list. System tags can not be added or deleted but can be customized.
Let’s have a look at the Recent tag and its elements:
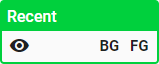
visibility Clicking this will stop displaying this tag
visibility_off Indicates the current tag is not visible and will not be displayed. To turn it on simply click on it and the icon will change to visibility
 Stands for Background color. When you click it a color palette will be displayed and you can change the color of the tag. Let’s change it to red to see how it will reflect the Recent tag:
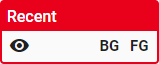
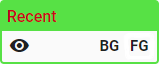
 Stands for Foreground color. When you click it a color palette will be displayed and you can change the color of the tag. Let’s change it to red to see how it will reflect the Recent tag:
Custom tags
Custom tags to be displayed in WebDav folders. Any of the custom tags will appear if the tag’s RegEx pattern matches part of the file name. Apart from the options of System tags, the custom one has two extra:
settings Edit menu, where you can customize your custom tag:
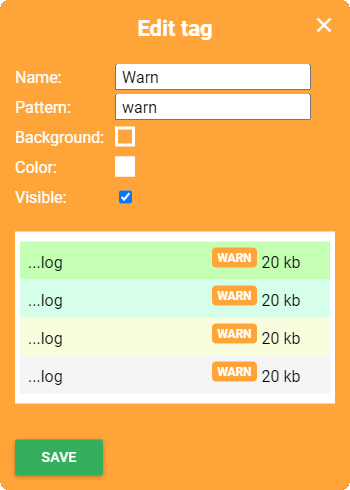
Let’s see what the Edit menu has as options:
- Name - In this field, you provide a name for your custom tag.
- Pattern - Here you provide a RegEx pattern for your custom tag. Using the pattern, DWithEase will match the pattern with the file name when listing .log files and will attach the custom tag to it.

- Background - By clicking on its square you can change its Background color.
- Foreground - By clicking on its square you can change its Foreground color.
- Visible - Determines if the custom tag is visible or not.
- delete_forever Delete the custom tag.
Plugins
Custom Plugins allow you to extend Business Manager with your own custom JavaScript and CSS user scripts directly in your browser.
What you can build with Plugins
- Automate repetitive form fills, validations, or catalog tweaks.
- Inject custom styles, badges, or warnings for specific sites or environments.
- Add workflow shortcuts and helper buttons to specialized Business Manager screens.
Plugin Management
- Built-in Editor: Write and edit JavaScript and CSS with syntax highlighting and instant error detection.
- Execution Rules: Run plugins on all Business Manager pages, restrict to matching URL patterns (using Regex or wildcard matching), or run manually.
- Quick Toggles: Instantly enable or disable individual plugins with one switch.
- Import & Export: Backup and share your plugins as JSON files across your team.
- Community Sharing: Contribute plugins and explore solutions shared by the community on GitHub at github.com/ForkPoint/dwithease.
Discover
Discover provides curated recommendations for complementary e-commerce and developer superpowers built by ForkPoint (including CatalogSpark, IntentFusion, AgenticStorefront, RetailVerify, and RetailPace).
Calm & Privacy-First Design
- Non-intrusive: Recommendations are displayed as clean, informative cards without badges, sound alerts, or popups.
- 14-Day Frequency Cap: Automatic placements share a strict 14-day frequency cap across both options and popup, ensuring suggestions never interrupt your focus.
- Full User Control: You can dismiss any recommendation by clicking Not for me, or select Pause promotions for 30 days to temporarily turn off all suggestions.
- Zero Third-Party Trackers: Discover only highlights ForkPoint ecosystem products built for Salesforce Commerce Cloud developers. There are no ad networks, tracking cookies, or external ad profiles.
About
More information about the extension.
- You can check the current version of DWithEase installed on your Browser.
- Get help with using DWithEase - Clicking on it will take you to the DWithEase documentation.
- Report an issue - Will take you to the Google Chrome Extension store, where you can report your issue.
Our team needs every opinion about DWithEase. It is created for all of us - Salesforce Commerce Cloud B2C developers. And we believe together we can make it better.
- Changelog - Clicking on it will open the Changelog of the extension, making you able to track what has been changed with every released version.
The rest of the page is dedicated to our developers who put their hearths in this extension. Thank You!
Was this page helpful?
Help us improve the DWithEase documentation.